Roasted Brussel Sprout Salad

Posted by Shari & Hutch on

When I was a kid, I'd run the other way if anyone made mention of the words "Brussel sprouts."  While I liked many vegetables, these boiled, mushy, over-salted green balls were simply...YUCK!  Even as my taste buds got more adventurous, I continued to shy away from this particular cruciferous vegetable.

One Thanksgiving, a number of years ago now, our lovely sister-in-law Sue reintroduced us to these tiny, green, cabbage-like vegetables, prepared in a completely different way.  She brought forth a steaming bowl of roasted Brussel sprouts, which had been coated in olive oil, fresh garlic, sea salt, and cracked pepper.  Tentatively, I tried one, then another, and within a few minutes, found myself guarding the serving bowl, hoping that no one else wanted any seconds.  Where had these been all of my life?  A new love affair began...and we started thinking of all the different ways to use and eat roasted Brussel sprouts!  

Here's one of our favorite ways to make a fun, colorful, healthy salad for any time of year, and works well as an accompaniment to any main dish at a holiday table.  This can be made the day before an event, thus reducing the stress on the kitchen and chefs.  This recipe is designed for 3-4 servings, and all of the ingredients are estimates.  You want more or less of this or that?  Go for it!

**Save 10% on Otzi products with our discount code: CANLIFE (entered at checkout)**
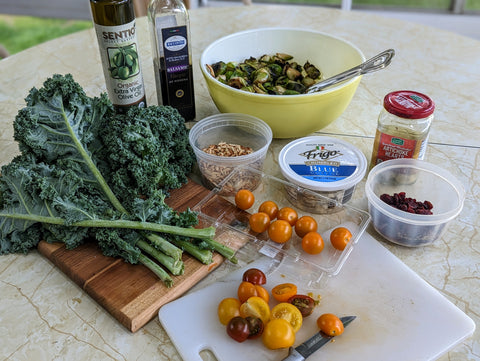
Ingredients

1/2 pound of Brussel sprouts, sliced in half

2 TBSP olive oil

2 cloves fresh garlic, crushed

Dash of sea salt

Dash of cracked black pepper

----------------------------------------

15 grape tomatoes, sliced in half

1/2 tub of blue/gorgonzola cheese

4 healthy stalks of curly kale, stripped and chop into small pieces

2 tsp olive oil (for massaging the kale)

8 marinated artichoke halves, split in half

1/4 cup of dried cranberries

1/4 cup of toasted slivered almonds

Salt & pepper to taste

Balsamic vinaigrette, to taste


Instructions

While you can roast Brussel sprouts in the oven, we love to make them over a grill or on the stove top as they take less time and tend to get less mushy.  Slice them in half, trim off the stem end a bit, and put them in a large mixing bowl.  Coat them with olive oil, salt, pepper, and garlic. Roast the sprouts in a large covered pan for about 15-20 minutes, turning regularly to get a good char on each side.  When you can easily poke them with a fork, remove them from the heat and let them completely cool.  Note: You are seeking an al dente texture, not mushy.  

While the sprouts are roasting, massage the kale with 2 tsp of olive oil, salt, and pepper until the leaves are coated and feel more tender.  If you’ve never done this, just work it around the bowl, through your hands, giving it a good “massage.”  Set aside.

Once the sprouts are cooled, mix in the rest of the rest of the ingredients, toss with your favorite balsamic vinaigrette and serve!


Meet the authors: Shari and Hutch from Freedom in a Can!

In 2012, Shari Galiardi & David Hutchison left behind careers and a comfortable home in North Carolina to travel with the vintage camper trailer they lovingly restored, outfitted with solar, and named "Hamlet." What began as a short break from careers and responsibility quickly turned into a love affair with roadlife. They have parlayed their higher education backgrounds, desire for life-long learning, and thirst for adventure travel into writing, photography, video production, public speaking gigs from coast to coast, and cooking. Known to their friends as simply Shari & Hutch, you can learn more about their full-time, solar-powered adventures on their website at freedominacan.com. Or, follow them on FacebookInstagram, and YouTube as “Freedom in a Can, LLC.”

Read more →

Deep Dish Blueberry Pancake

Posted by Erin DuBois on

Pancakes are a staple camp breakfast in our family, and our love of pancakes has led us to experiment with many different recipes. We’ve made banana pancakes, pumpkin pancakes, chocolate-filled pancakes, and even crepes on our camp grills. We’re such pancake lovers that we decided we needed to make the perfect birthday pancake, and this recipe stemmed from there!

Deep dish pancakes, also known as Dutch Baby pancakes, are a versatile dish that can be enjoyed as a breakfast, brunch, dessert, or even a birthday cake. They’re made with a batter that contains a higher ratio of eggs, flour, and milk compared to traditional pancakes. This results in a thicker batter that rises significantly during baking, creating a puffy and airy texture. Unlike their relatively flat counterpart, deep dish pancakes are thick like a cake and hold up well to a variety of toppings and fillings.

We’ve found that baking deep dish pancakes in a Dutch oven is a great way to achieve a perfectly cooked and evenly baked pancake with a crispy exterior and a soft and fluffy interior. Here are a few reasons why:

  1. Even heat distribution is made possible by the thick walls of the Dutch oven, which guarantees that the pancake will cook without any hot spots. This is crucial for deep dish pancakes because they are thick and take longer to cook.
  2. Holds heat: A Dutch oven holds heat very well, so the pancake will continue to be warm after you take it off the grill. This is especially helpful if you are serving pancakes to a crowd and need to keep them warm while preparing other dishes.
  3. Versatility: A Dutch oven is a multipurpose cooking vessel that can be used for both indoor in an oven and outdoor cooking on a grill.

This deep dish pancake recipe combines lemon and blueberries, adding a bright and refreshing burst of flavor to the rich and indulgent pancake base. Here’s how each ingredient contributes to the overall flavor profile:

  1. Lemon zest: The zest of a lemon is the outer layer of the peel, which contains flavorful oils that add a bright, citrusy aroma and taste to the pancake. The zest is grated finely and mixed into the pancake batter, where it infuses the entire pancake with a tangy lemon flavor.
  2. Lemon juice: Lemon juice is mixed with the blueberries in this recipe, with powdered sugar sprinkled on top. This creates a sweet but refreshing flavor that lightens the dish and makes it perfect for a warm summer day.
  3. Blueberries: Blueberries are a classic pancake topping, and they pair particularly well with the lemon in this recipe. Their sweet and slightly tart flavor complements the tangy lemon and sweet powdered sugar.

The lemon and blueberry in this deep dish pancake work together to create a balanced and refreshing flavor that is perfect for a summertime brunch or dessert. The lemon adds a brightness and zing to the rich rich and fluffy pancake base, while the sweet and juicy blueberries provide a burst of flavor and texture. Overall, this is a versatile, delightful dish that has become our favorite birthday breakfast cake whether we’re at home or at the campsite.


Deep Dish Blueberry Pancake

A refreshing dish for a satisfying and filling breakfast, brunch, or dessert!


*This recipe for a 8” diameter / 2 quart Dutch oven.

Prep time: 10 minutes

Cook time: 25 minutes

Total time: 35 minutes


Servings: 4

Course: Breakfast, Brunch or Dessert

Grill type: Otzi Ember Dual-Person Grill in Stainless Steel


Ingredients (4 servings, using a 8” diameter / 2 quart Dutch oven):

3/4 cups flour

4 eggs

3/4 cups milk 

Zest from one lemon

Pinch of salt

2 Tbsp butter 

2 cups blueberries

2 Tbsp powdered sugar 

1 Tbsp lemon juice 


Instructions: 

  1. Place Dutch oven on grill with the lid on to begin heating up.
  2. Mix blueberries and lemon juice together and set aside.
  3. In a medium bowl, mix eggs, milk, vanilla, and lemon zest together. 
  4. Add flour and salt and whisk together until blended.
  5. Add butter to Dutch oven and allow to melt. Once melted, pour batter into Dutch oven and replace lid.
  6. Cook for 25 minutes, rotating 1/4 turn every 5 minutes so the batter cooks evenly.
  7. Remove from heat and cover with blueberries. 
  8. Replace lid and allow blueberries to warm for 3-5 minutes. 
  9. Remove lid and sprinkle powdered sugar on top. Cut into 4 slices and enjoy! 

If you try this recipe, be sure to let us know! We’d love to hear your thoughts. Leave a rating and comment below, and tag a photo @otzigear on Instagram for your chance to be featured on our page!

Read more →

Far Out Fusion Burgers

Posted by Shari & Hutch on

Cooking burgers on the grill is one of the hallmarks of summer, and why should vegetarians have to miss out on all the fun, or suffer through a sandwich comprised of a partially frozen disk of cardboard hastily dried out upon an open flame? This recipe works equally well for ground chuck, ground buffalo, ground turkey, or one of the many plant-based burger substitutes. 

Like many good ideas, this one gets a little bit better each time we make it, and the base recipe was passed on to Hutch’s mom before making its way to us.  While we can’t credit the original source, it’s been a hit every time we’ve shared with friends.  The Otzi Gear Flame Grill offers one of the best reasons to try this recipe somewhere beautiful. 

**Save 10% on Otzi products with our discount code: CANLIFE (entered at checkout)**

We are certainly no strangers to unique and tasty burger toppings.  Ever try a fried egg and pickled beet slice?  Don’t mind if I do!  Hatch chilis with avocado and Monterey Jack?  Yes, please!  This particular fusion of flavors truly blew our minds.  "That sauce is FAR OUT!" Hutch exclaimed the first time he tasted it, and indeed, it is.  

Most of this work can be done ahead of time, but as you can see in the video, it is super easy to do even while camping. The burger mixture can wait overnight if it is refrigerated. The sauce keeps well for about 4 days in the fridge (as if you could wait that long!) and is remarkably good in salads, slaw, sandwiches, over eggs, anything grilled, and does double time as an amazing veggie dip.  Trust us, you'll suddenly find a reason to put this sauce on everything! 

The original recipe calls for water chestnuts in the mix, we once substituted fresh jicama out of necessity and loved it so much that we’ve never gone back.  The fresh jicama offers a less salty finish to the burger than the canned water chestnuts. As for plant-based substitutes, we prefer Beyond Meat to anything else, because it tends to crisp up a bit more like real beef burgers, but that’s all up to the taste of the griller.   


(Makes 4 x ¼ pound burgers)

Far Out Sauce!

  • 3/4 cup mayonnaise
  • 1/4 cup Greek yogurt (Fage works best)
  • 1/2 tightly-packed cup fresh mint leaves
  • 1 teaspoon sugar, or to taste
  • 3 tablespoons fresh lime juice
  • 2 teaspoons sriracha or other hot sauce, or to taste

Fusion Burgers

  • 1 package Beyond Beef (1 pound) or regular beef, ground turkey...whatever.
  • 2 large garlic cloves, minced
  • 1/2 cup fresh jicama, (or water chestnuts) cut into 1/4-inch cubes
  • 1/2 cup coarsely crushed pretzels or Ritz crackers
  • 1.5 TBSP Worcestershire sauce
  • 1 teaspoon freshly ground black pepper
  • 3 whole scallions, thinly sliced
  • 1 egg

Toppings

  • Your favorite burger buns
  • 1 medium cucumber, ultra-thin slices with veggie peeler or mandolin
  • Fresh cilantro branches

Instructions

  1. Make the sauce by pureeing the mayonnaise, mint leaves, sugar, lime juice, and the hot sauce with a food processor or immersion blender. Chill the sauce until you are ready to use it (up to 4 days).
  2. In a large bowl, blend together all the burger ingredients and divide into 4 burgers. You can chill (covered) until ready to cook (up to 24 hours).
  3. Cook the burgers, turning them multiple times to make sure it all cooks.  If using Beyond Beef for the first time, it cooks very similarly to regular beef.  We like to sear the outside a bit for an extra caramelized flavor.
  4. Toast the buns, slather the sauce generously on both sides, and top with cilantro and cucumbers slices.
  5. Serve up the burgers and enjoy!  

To make the slaw shown in the video:

Use a mandolin to thinly slice purple cabbage, carrots, apples, slivered almonds, and green onions.  Mix well, add Far Out Sauce, and cracked black pepper to taste.


Meet the authors: Shari and Hutch from Freedom in a Can!

In 2012, Shari Galiardi & David Hutchison left behind careers and a comfortable home in North Carolina to travel with the vintage camper trailer they lovingly restored, outfitted with solar, and named "Hamlet." What began as a short break from careers and responsibility quickly turned into a love affair with roadlife. They have parlayed their higher education backgrounds, desire for life-long learning, and thirst for adventure travel into writing, photography, video production, public speaking gigs from coast to coast, and cooking. Known to their friends as simply Shari & Hutch, you can learn more about their full-time, solar-powered adventures on their website at freedominacan.com. Or, follow them on FacebookInstagram, and YouTube as “Freedom in a Can, LLC.”

Read more →

Charred Sweet Pepper & Tomato Salsa

Posted by Erin DuBois on

Outdoor grills are often considered a tool for cooking main courses only, such as steaks, hot dogs, or burgers. But cooking on a charcoal or wood-fueled grill adds such a delicious smoky flavor, that our family just can’t get enough. We’ve experimented with making everything from clams to pasta skewers, apple pie, and even funnel cake! 

We decided to make this salsa recipe to add some extra flavor and excitement to our camping trips. We replaced store-bought salsa and chips with this recipe, and we haven’t looked back since. This smoky salsa is perfect for cooking on our flat pack camping grills, as it requires minimal prep and can be cooked quickly over high heat. The combination of char-grilled sweet peppers and tangy tomatoes will make your mouth water and keep you coming back for more!

Salsa has a long and varied history, with numerous adaptations and variations coming from different parts of the world. The word “salsa” itself is derived from the Spanish word for sauce, and it is believed that the salsa originated in Central and South America, where prehistoric peoples like the Aztecs, Mayans, and Incas produced hot sauces with chiles, tomatoes, and other ingredients. These sauces were frequently used to intensify flavors or add a little heat to dishes.

Early in the 20th century, the United States developed salsa that is familiar to us today. Mexican-American communities in Texas and California started infusing regional produce like bell pepper and corn with traditional Mexican ingredients like chiles, onions, and tomatoes to create a new kind of salsa that eventually became a cherished staple of American cooking.

We combined a few of our favorite things for this salsa recipe; sweet peppers, heirloom tomatoes, grape tomatoes, and jalapeños. The sweet peppers add a mild, slightly sweet flavor to the salsa, which compliments the acidity of the tomatoes. Heirloom tomatoes, with their juicy and flavorful flesh, add a rich, fruity taste that is both tangy and sweet. Grape tomatoes, on the other hand, have a slightly more intense sweetness and firmer texture, which provides a nice contrast to the softer, juicier heirloom tomatoes. 

The jalapeños give the salsa a spicy kick that helps balance out the sweetness of the other ingredients. Jalapeños are the ideal choice for adding a little heat to this dish without overpowering it because of their mild to medium heat level. As a result, the salsa tastes even more vibrant and delicious. The heat from the jalapeños also helps to bring out the natural flavors of the other ingredients.

Red onion and garlic are also included in this recipe, two ingredients that are crucial for giving this charred sweet pepper and tomato salsa flavor depth and complexity. Red onions are renowned for their subtle sweetness and crisp texture, which gives salsa a nice crunch. It also adds a light sharpness that helps balance the sweetness of the tomatoes and peppers.

On the other hand, garlic gives the salsa a strong, earthy flavor. When garlic is cooked, aromatic compounds are released that give the salsa depth and a more savory taste.

All of these components come together to make a salsa that is both savory and sweet, with just a hint of heat. The combination of textures, from the soft tomato flesh to the crunch of the peppers and onions, also contributes to the salsa’s allure. So this salsa is sure to be a hit, whether you use it as a topping for grilled meats or a dip for tortilla chips!


Charred Sweet Pepper & Tomato Salsa

Spice up your outdoor cooking with this irresistible char-grilled salsa that strikes the perfect balance of sweetness, savoriness, and spiciness!


Prep time: 10 minutes

Cook time: 15 minutes

Total time: 25 minutes


Servings: 2

Course: Snack or Condiment

Grill type: Otzi Ember Dual-Person Grill in Stainless Steel


Ingredients:

3 heirloom tomatoes (halved) 

1-2 jalapeños 

6-8 sweet peppers

8oz grape or cherry tomatoes 

1/2 red onion

3 cloves garlic

1 Tbsp salt (or to taste)


Instructions:

  1. Place veggies on grill top and cook to desired doneness. Remove and allow to cool.
  2. Add tomatoes to a large mixing bowl. Mash with fork. 
  3. On a cutting board dice jalapeños, sweet peppers, red onion, and garlic. Combine with tomatoes in the mixing bowl.
  4. Add salt and mix well.
  5. Serve with tortilla chips and enjoy!

If you try this recipe, be sure to let us know! We’d love to hear your thoughts. Leave a rating and comment below, and tag a photo @otzigear on Instagram for your chance to be featured on our page!

Read more →

Dutch Oven Bread

Posted by Erin DuBois on

 Making a meal outside has its own unique charm, as anyone who enjoys camping or outdoor cooking will attest. While there are many traditional camping meals to pick from, nothing quite compares to the aroma of freshly baked bread filling your campsite. That’s where Dutch oven bread comes in. This rustic loaf is easy to prepare, tasty, and great for sharing. We'll show you how to make Dutch oven bread on our flat pack camp grill in this blog post so you can have delicious homemade bread no matter where your adventures take you.

The beauty of Dutch oven bread is that it’s relatively simple to make, with just a few basic ingredients: flour, water, yeast, and salt. But despite its simplicity it has a rich, complex flavor. It’s also much healthier than store-bought bread, which is full of preservatives and added sugars. At its core, Dutch oven bread is a hearty, comforting bread that pairs well with soups or stews. It’s also a great way to impress your family and friends with your baking skills!

To make Dutch oven bread on one of our Otzi Ember flat pack grill, you’ll need an 8” diameter Dutch oven. A Dutch oven is a cast-iron pot with a tight-fitting lid that’s perfect for baking bread as it helps to create a steamy, moist environment inside the pot that allows the bread to rise and form a crispy crust on the outside. 

The key to making this recipe is allowing the bread dough enough time to rise. This is essential for creating a light, airy loaf with a good texture and flavor. When bread dough is allowed to rise, it undergoes a process known as fermentation, which is when the yeast in the dough breaks down the sugars in the flour and produces carbon dioxide gas. 

As the carbon dioxide gas builds up, it causes the dough to expand and become lighter and more porous. This is what creates the characteristic air pockets and fluffy texture of bread. The fermentation process also helps to develop the flavor of the bread and give it a complex, tangy taste.

But it’s not just about the flavor and texture. Letting bread dough rise also makes the bread easier to digest. During fermentation, the yeast breaks down complex carbohydrates in the dough, making them more easily digestible. This is why some people who have trouble digesting bread or gluten can often tolerate sourdough bread, which has undergone a longer fermentation process.

This recipe requires two rises, for a total of approximately 1.5 hours - 2.5 hours. Scroll down to the recipe for the full instructions. While it can be tempting to rush through the rising process in order to get your bread cooking faster, it’s important to give the dough the time it needs to ferment properly. Skipping or shortening the rising time can result in a dense, heavy loaf that doesn’t fully rise or have the same flavor or texture as a well-risen loaf. But if you follow our instructions, you’ll end up with a light, fluffy loaf with a good texture and delicious flavor!

Dutch Oven Bread, 1948 Jeep Willys style

A rustic, crusty bread with a rich and complex flavor. Simple to make and perfect for sharing!


*This recipe for a 8” diameter / 2 quart Dutch oven.

Prep time: 1.5 - 2.5 hours

Cook time: 45 - 50 minutes

Total time: 2.5 - 3.5 hours


Servings: 4-6

Course: Snack or Side Dish

Grill type: Otzi Ember Dual-Person Grill in Stainless Steel


Ingredients:

2 cups bread flour or unbleached all-purpose flour 

1 tsp active dry or rapid rise yeast

1 Tbsp sea salt

1 cup warm water

1 Tbsp canola oil

1 Tbsp rosemary 


Instructions:

  1. In a medium mixing bowl mix together flour, yeast, 2/3 of the salt and 1/2 the rosemary. Add warm water (make sure it’s not hot). Stir until well combined. 
  2. Cover with towel and let sit at room temperature until the dough doubles in size. This typically takes 45-90 minutes. 
  3. Add 1 tsp canola oil to the Dutch oven, drizzle 1 tsp on the dough, and rub remaining oil on your hands. Gently release the dough from the sides of the bowl and shape into a ball. 
  4. Place dough in oiled Dutch oven and cover with towel. Let rise until full of air, this takes 30-60 minutes.
  5. When dough is close to being full of air, get grill started with either charcoal or wood. Place grill plate on grill.
  6. Score the dough with an X in the middle and sprinkle dough with remaining rosemary and salt. 
  7. Place cover on Dutch oven and set on heated grill. Bake for 45-50 minutes or until browned. (Optional- add hot coals on top of the covered Dutch oven to brown the top of the bread).
  8. Remove from grill and allow to cool for one hour. Slice, serve and enjoy!

If you try this recipe, be sure to let us know! We’d love to hear your thoughts. Leave a rating and comment below, and tag a photo @otzigear on Instagram for your chance to be featured on our page!

Read more →
  • 1
  • 2
  • 3